Setting Up a ZNC IRC Bouncer to Use Tor
- 21 minsMotivation
I’m at least partially writing this as an aid to my own memory. It took me a little while to muddle through and get everything set up. I recently had to do part of the process again and struggled to remember. Writing this blog post seems like a good way to help my future self and others looking to do the same thing.
I’m going to assume that you want your bouncer to connect to Freenode. The steps should be fairly similar for other IRC servers.
ZNC
Why use a bouncer at all? Couldn’t I just directly connect to the IRC server?
Yes, you could. The disadvantage is that you will not receive messages sent while you were away. For some channels you may not want to miss a single message. For others, you may just want the last 50 messages so that you have the context of the conversation that you just entered.
Another advantage of a bouncer is that we can also set up “client buffers”. These are separate buffers for the different clients that you may connect from. This ensures that if I connect from my desktop’s IRC client, then my laptop, the messages will be replayed correctly for both.
This is similar to the problem that IMAP email solves. Emails are synced accross devices these days. In the 90s, we used POP3. This pulled emails from the server; clearing the buffer in the process. This meant that (in the standard configuration), if you had two devices, your emails would be split accross them. If an email was pulled to your laptop then it wouldn’t be pulled to your desktop later.
Tor
When using IRC, we tend to leak quite a lot of information about the hostname we’re connecting from. This is somewhat undesirable if you’re connecting directly or self-hosting an IRC bouncer, since it may make you a target for people probing for vulnerabilities. Generally speaking, revealing your hostname and/or IP address publicly when engaging in an online community is best avoided if possible.
Setting Up Your Freenode Account
Firstly, we need to set up a Freenode account. We will be directly connecting to Freenode from the IRC client (without using a bouncer) for this step. The ultra-paranoid may want to connect to a VPN (or perhaps take their laptop to a coffee shop) before doing this step. This is to prevent your true origin IP ever being leaked.
We will be using Weechat as our IRC client since it’s free/open-source and cross-platform.
Note: If you’re using a different IRC client, this tutorial will still be fairly applicable to you but you’ll need to look up how to achieve the same things with your client. This page may be of assistance. If you use Textual, this page helped me get set up.
To install on OSX (with brew):
$ brew install weechatTo install on a Debian-based Linux (such as Ubuntu):
$ sudo apt update && sudo apt install -y weechatFor other OSes, either install from source or look up weechat in your system’s package manager.
Next launch weechat by entering weechat at the terminal.
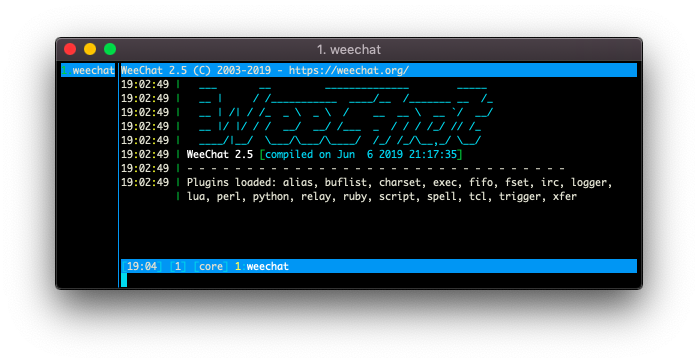
The program will launch and you should see something like this:
You’ll notice that you have a prompt at the bottom of the terminal window. We’re going to use that to set up our connection with freenode:
/server add freenode-direct chat.freenode.net/6697 -ssl
/set irc.server.freenode-direct.nicks "zncblogpost,_zncblogpost"
Note: if you don’t want to manually connect each time time you run weechat, you can set the -autoconnect flag when adding the server config. For the purposes of this tutorial, I recommend leaving autoconnect off for any connections we create until everything is set up.
After executing these two commands you should see similar output to the following:
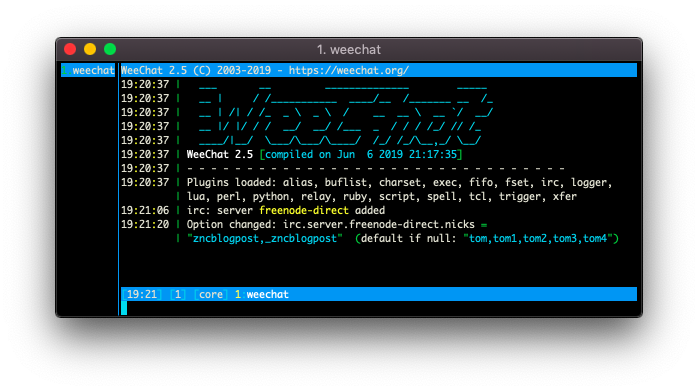
You can specify multiple comma-separated names. These will be tried in order and your nick will be the first name in the list that isn’t already in use.
We connect via the following command:
/connect freenode-direct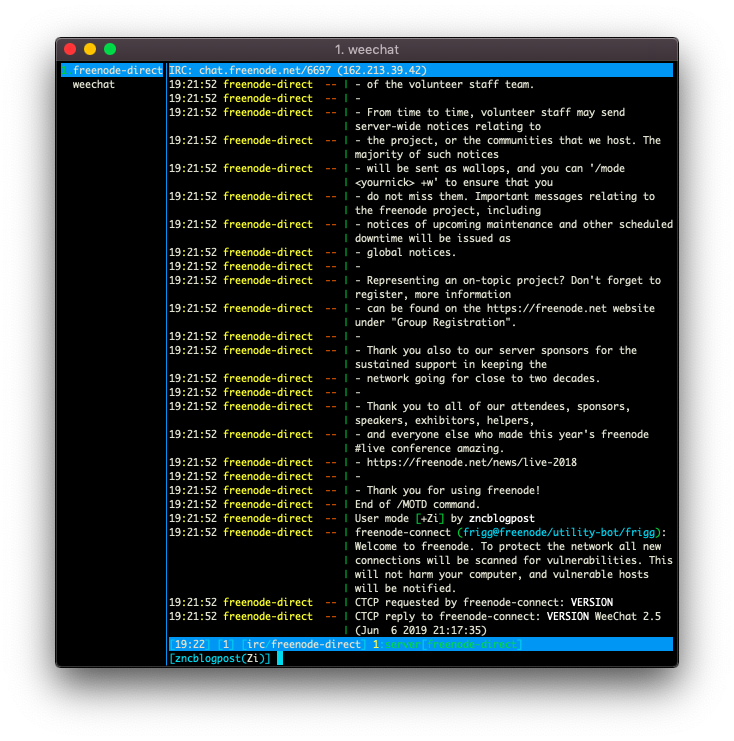
You should see a successful connect operation signified by a lot of text appearing in the buffer welcoming you to freenode.
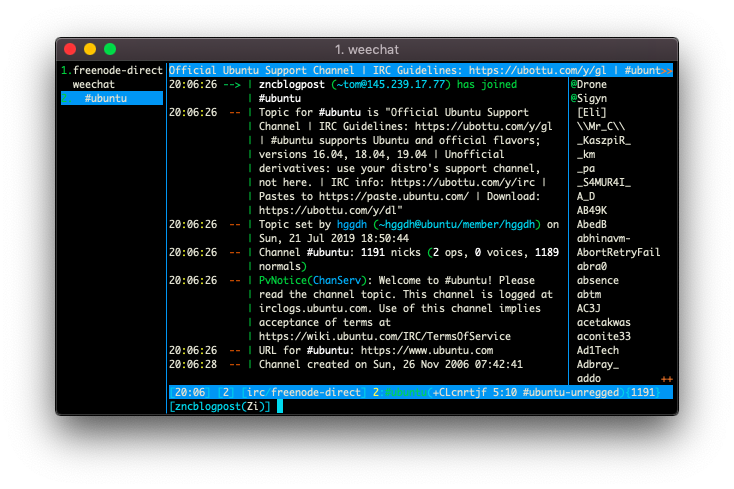
At this point there’s nothing stopping you from joining a channel and chatting. You’ll notice though that many channels redirect you to some other channel:
/join #ubuntuIf you do this, you’ll see you’re actually redirected to #ubuntu-unregged. The reason why is explained to you upon joining the channel:

You can follow the instructions here (use Ctrl+N and Ctrl+P to navigate forward and back through your channel buffers to freenode to see the output of executing the /msg nickserv help register command) but I’ll summarise it here so that isn’t necessary.
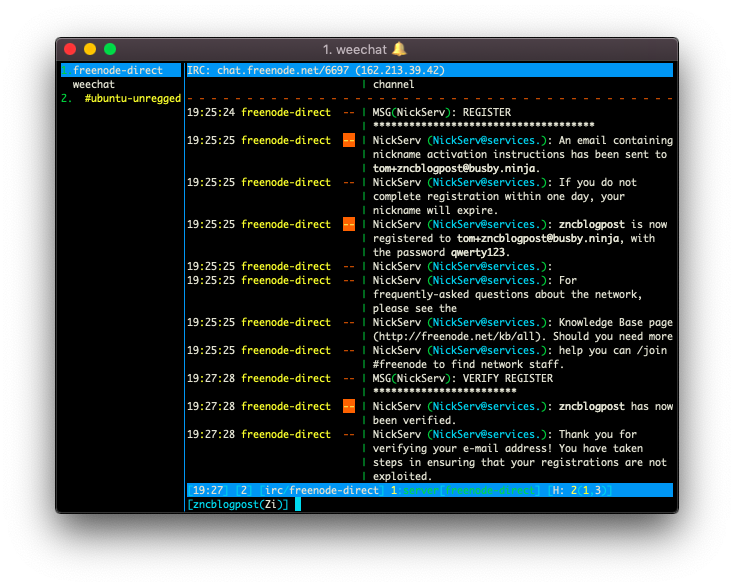
Registration essentially marks a given nick as yours. This is analagous to signing up for an account with a given username on other services. We do this in the following way (your password will show up in the prompt as asterixes):
/msg NickServ REGISTER qwerty123 tom+zncblogpost@busby.ninjaNote: I changed this password prior to making this blog post public :P

When you check your inbox you’ll find an email from freenode with further instructions:
In order to complete your account registration, you must type the following
command on IRC:

/msg NickServ VERIFY REGISTER zncblogpost mzubwubihvmn
After running this you should see something like the following in your freenode buffer:
If you now try to join #ubuntu you’ll see that it connects normally and you can chat freely:
However, currently, you’ll need to run /msg NickServ identify <password> every time you connect. We can prevent the need to do this with SASL.
To start with, we’ll set this up using the PLAIN method which takes your username/password but later on we’ll be authenticating with an SSL certificate. Instructions for this section from this page.
/set irc.server.freenode-direct.sasl_mechanism PLAIN
/set irc.server.freenode-direct.sasl_username zncblogpost
/set irc.server.freenode-direct.sasl_password qwerty123
/save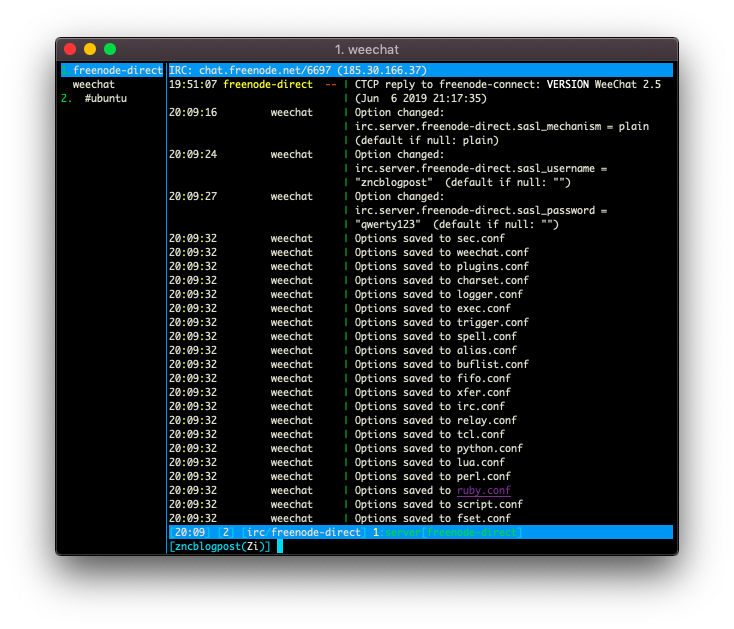
If we /quit and then open up weechat again we’ll see that when we connect (/connect freenode-direct), it will authenticate with the freenode network automatically:
...
19:51:06 freenode-direct  -- | SASL authentication successful
...
We have now set up our connection with freenode and registered our nick. If we didn’t care about using Tor or a bouncer we could stop here.
Installing Your ZNC Bouncer
I will assume that you already have SSH access to a suitable server. Getting an externally-accessible server set up is outside the scope of this tutorial. There are many other tutorials which cover this for the various hosting providers. I’ll be using a fresh Amazon AWS instance in the following section and will loosely follow instructions from this page.
Firstly, let’s install znc:
$ sudo apt update && sudo apt install -y zncNext item on the agenda is to install Tor:
Note: Further details about this process here. I’m using Ubuntu 18.04 LTS. For other OSs, see the linked page for instructions.
$ sudo su -
⌗ printf "deb https://deb.torproject.org/torproject.org bionic main\ndeb-src https://deb.torproject.org/torproject.org bionic main\n" > /etc/apt/sources.list.d/tor.list
⌗ curl https://deb.torproject.org/torproject.org/A3C4F0F979CAA22CDBA8F512EE8CBC9E886DDD89.asc | gpg --import
⌗ gpg --export A3C4F0F979CAA22CDBA8F512EE8CBC9E886DDD89 | apt-key add -
⌗ logout
$ cat /etc/apt/sources.list.d/tor.list
deb https://deb.torproject.org/torproject.org bionic main
deb-src https://deb.torproject.org/torproject.org bionic main
$ sudo apt update && sudo apt install -y tor deb.torproject.org-keyring
Next we need to install proxy chains and bind the freenode onion address to a local IP
$ sudo apt install -y proxychains
$ printf "mapaddress 10.99.99.90 freenodeok2gncmy.onion\n" | sudo tee -a /etc/tor/torrc
$ sudo systemctl daemon-reload
$ sudo systemctl restart tor
Now that Tor is installed we can look into getting ZNC running and connecting to freenode via Tor. We want ZNC to run as a system daemon so we’ll be following the instuctions on this page. If your server OS does not use systemd, consult the page I just mentioned. Your instructions will differ slightly.
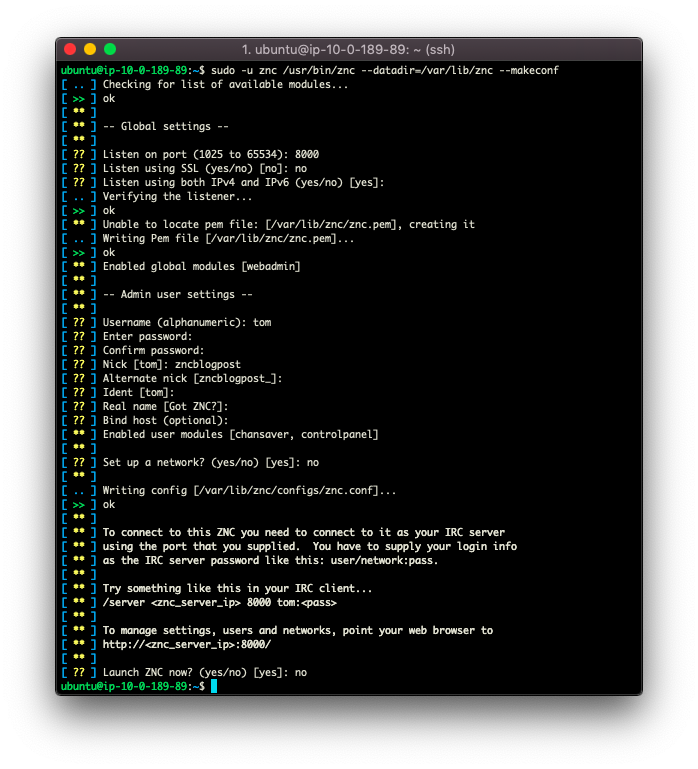
$ sudo useradd --create-home -d /var/lib/znc --system --shell /sbin/nologin --comment "Account to run ZNC daemon" --user-group zncWe now need to create the skeleton config for the server:
$ sudo -u znc /usr/bin/znc --datadir=/var/lib/znc --makeconfNote: if you want, you can enable SSL. However, the cert won’t be signed by a CA so you’ll receive a warning about this from your browser when you navigate to the page. See this footnote for notes about securing the connection to the web admin.
Now create the systemd unit:
/etc/systemd/system/znc.service
[Unit]
Description=ZNC, an advanced IRC bouncer
After=network-online.target

[Service]
ExecStart=/usr/bin/znc -f --datadir=/var/lib/znc
User=znc

[Install]
WantedBy=multi-user.target
It’s time to start the service.
$ sudo systemctl enable znc.service
Created symlink /etc/systemd/system/multi-user.target.wants/znc.service → /etc/systemd/system/znc.service.
$ sudo systemctl start znc.service
Now we’ve done that we can go to znc’s web interface at <host IP/DNS Name>:<Port we chose above>. For me this is http://52.16.112.138:8000/.
Note: Those of you following along using an AWS instance, don’t forget to allow incoming connections on any exposed ports via the security group.
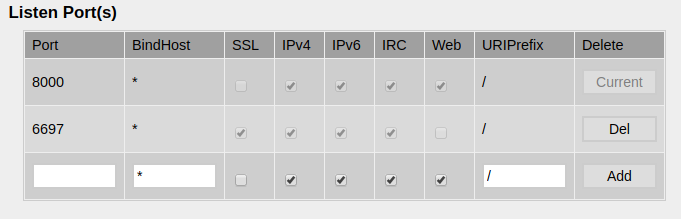
Log in to the web interface and go to “Global settings”. We want to add a specific port for SSL IRC connections:
Next we need to modify our systemd unit so that ZNC is loaded via proxychains:
/etc/systemd/system/znc.service
[Unit]
Description=ZNC, an advanced IRC bouncer
After=network-online.target

[Service]
ExecStart=/usr/bin/proxychains /usr/bin/znc -f --datadir=/var/lib/znc
User=znc

[Install]
WantedBy=multi-user.target
Now restart znc:
$ sudo systemctl daemon-reload
$ sudo systemctl restart znc.service
Configuring Your ZNC Bouncer to Connect to Freenode
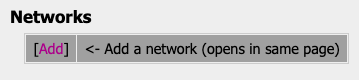
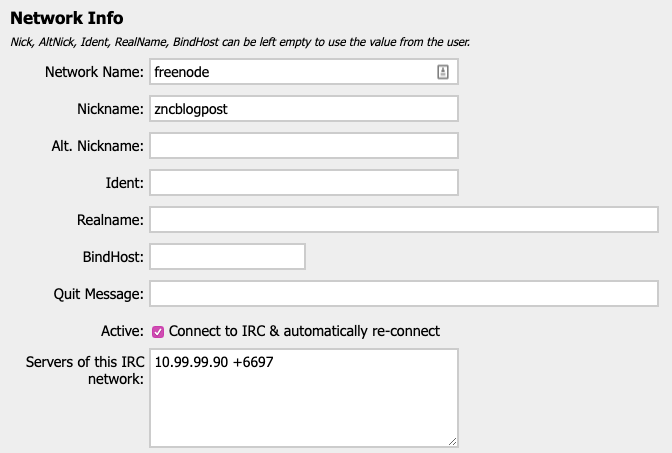
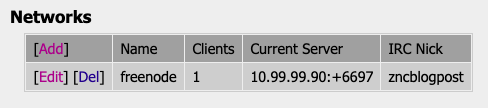
After this we’ll set up freenode in ZNC. Go to “Your settings” and then click “Add” in the Networks section:
Note: the IP is the mapped local IP address that we set up in the torrc file.
At this point I also set up the DNS so that our server is available at blogpost.busby.ninja.
Now we need to follow the instructions (taken from this page) to connect to our ZNC bouncer from weechat.
On our server, we need to get the SSL cert fingerprint:
$ sudo -u znc cat /var/lib/znc/znc.pem | openssl x509 -sha512 -fingerprint -noout | tr -d ':' | tr 'A-Z' 'a-z' | cut -d = -f 2
162f9c92f80b048efb1ec06d4d04edab9fb7c399c36a2879a23994197970c8fbcefbe264401ea626b600b01e04bf99a4b483cdfd16ca4246de7958bad54bda11
While inside weechat (replacing the relevant details with your own):
/server add freenode-znc blogpost.busby.ninja/6697 -ssl -username=tom/freenode -password=same_as_webadmin_password123
/set irc.server.freenode-znc.ssl_fingerprint 162f9c92f80b048efb1ec06d4d04edab9fb7c399c36a2879a23994197970c8fbcefbe264401ea626b600b01e04bf99a4b483cdfd16ca4246de7958bad54bda11
/save
/connect freenode-znc
You should see something like this in the buffer:
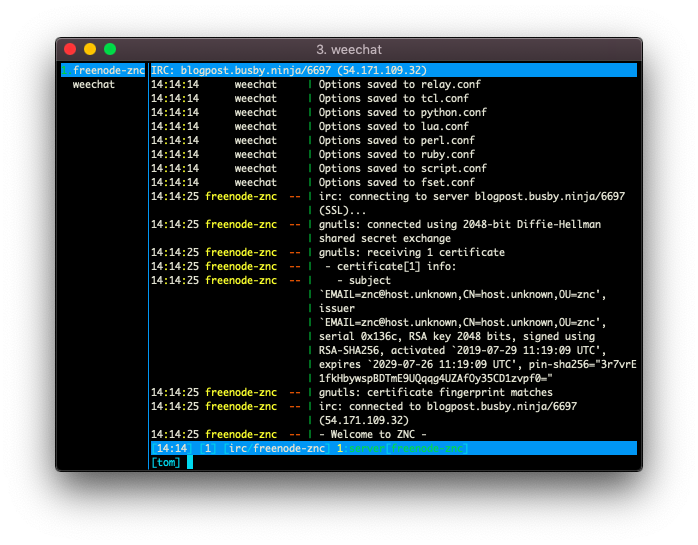
A short while later, you’ll notice another buffer pop up in the left hand bar called *status. Use Ctrl+N to navigate to that buffer.
You’ll see a lot of information about an SSL cert ending with something like this:
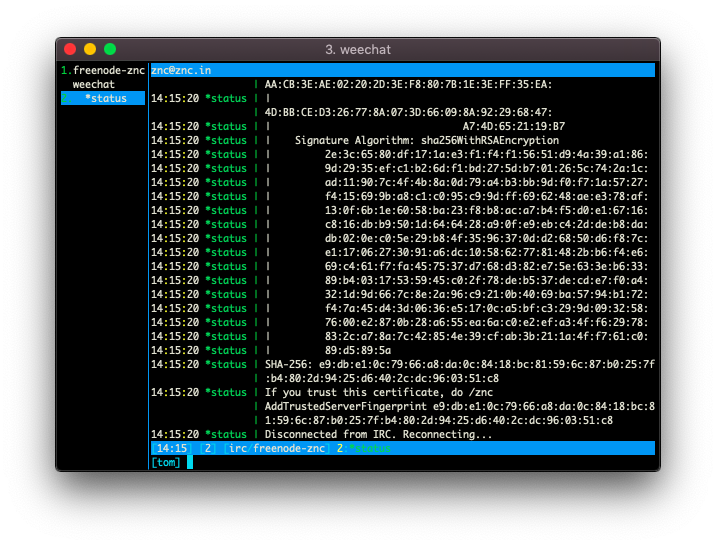
This is a message from ZNC asking us to approve the SSL cert that freenode is presenting to ZNC as it attempts to connect on our behalf.
By default, weechat won’t transmit commands it doesn’t recognise, so we need to whitelist /znc:
/alias add znc /quote zncWe will now follow the instructions and trust this fingerprint:
/znc AddTrustedServerFingerprint e9:db:e1:0c:79:66:a8:da:0c:84:18:bc:81:59:6c:87:b0:25:7f:b4:80:2d:94:25:d6:40:2c:dc:96:03:51:c8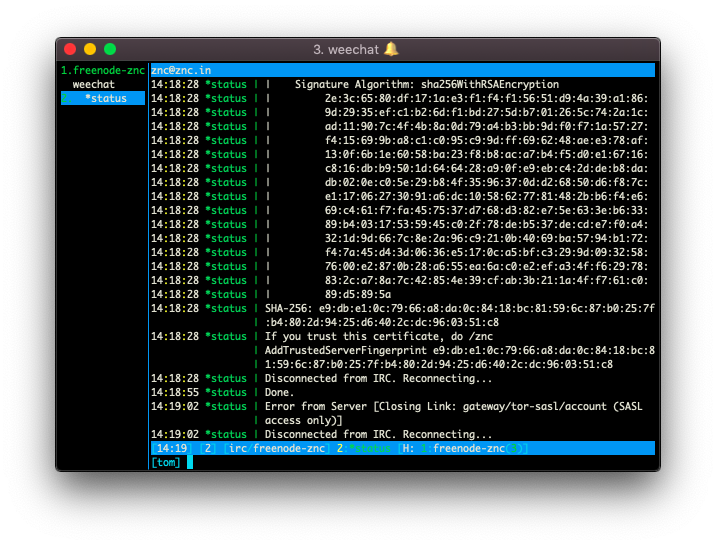
The SASL access only error relates to what is mentioned in the freenode tor blogpost which is that, when connecting to freenode via Tor, you must authenticate via a more secure means than PLAIN. We’ll set this up next. For now, let’s disconnect from ZNC:
/disconnect -allTo get set up with certificate-based SASL authentication, we’ll be following instructions from this page and this page.
On the server execute the following commands (replacing zncblogpost with your own nick):
$ openssl req -nodes -newkey rsa:4096 -keyout user.pem -x509 -days 3650 -out user.pem -subj "/CN=zncblogpost"
...
writing new private key to 'user.pem'
...
$ openssl x509 -sha1 -noout -fingerprint -in user.pem | sed -e 's/^.*=//;s/://g;y/ABCDEF/abcdef/'
c745ff09c1c5e11fef6fd8d9249124ce49a80194
Now that we’ve acquired a certificate and calculated its fingerprint, let’s move it to where ZNC cert module can find it (tom and freenode will be replaced with your ZNC username and ZNC network name):
$ sudo chown znc:znc user.pem
$ sudo mv user.pem /var/lib/znc/users/tom/networks/freenode/moddata/cert/
Next, we need to inform freenode’s NickServ of our certificate’s fingerprint. Because we don’t yet have a working ZNC connection, we’re going to reuse our old freenode-direct connection in weechat:
/connect freenode-directOnce connected we’ll inform NickServ of our fingerprint:
/msg NickServ cert add c745ff09c1c5e11fef6fd8d9249124ce49a80194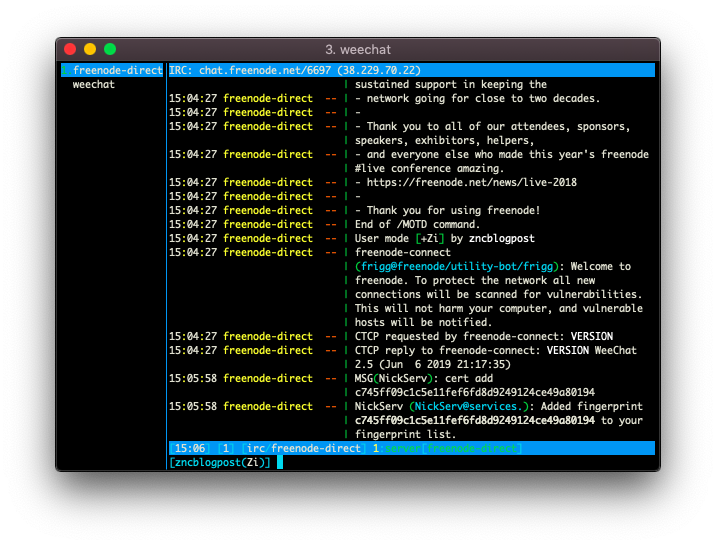
We can double check that things worked correctly:
/query NickServ cert list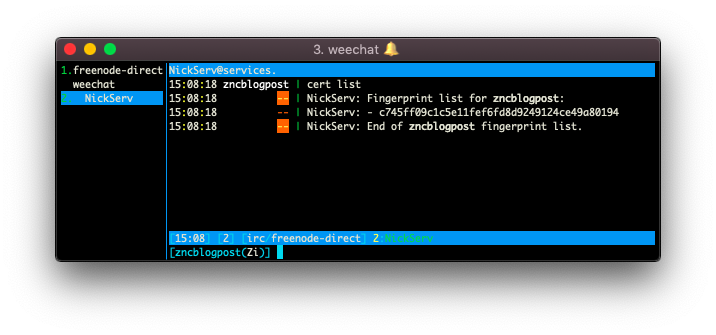
That’s all we need to do here, so let’s disconnect and reconnect to znc:
/disconnect -all
/connect freenode-znc
Note: you can navigate between open buffers with Ctrl+P/Ctrl+N and /close the old unused ones.
Let’s check in with the cert module to make sure it can see our certificate:
/query *cert info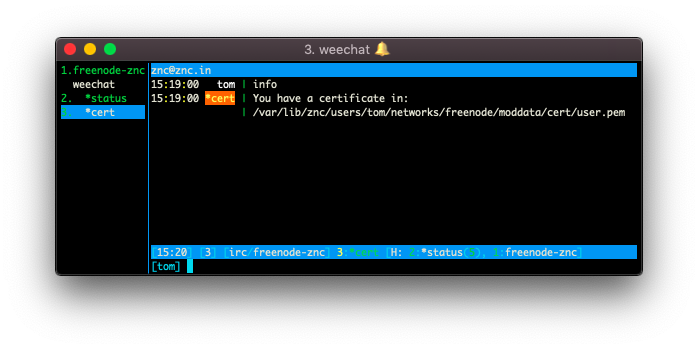
If you have a different output than above then your user.pem file is not in the right directory or maybe has the wrong permissions.
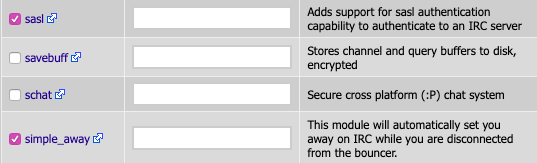
Next we need to tell ZNC’s sasl module to use our certificate:
/query *sasl Mechanism
/query *sasl Mechanism EXTERNAL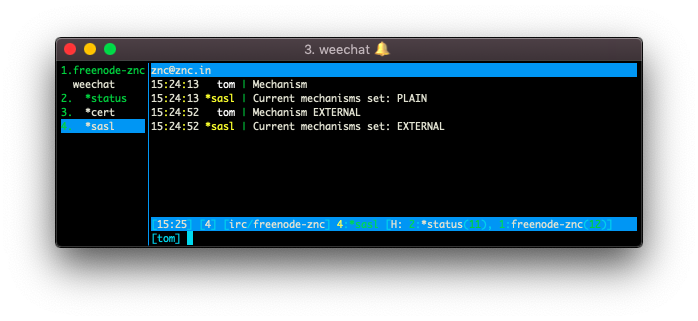
We can now navigate to our *status buffer and watch it connect:
15:25:16 *status | Connected!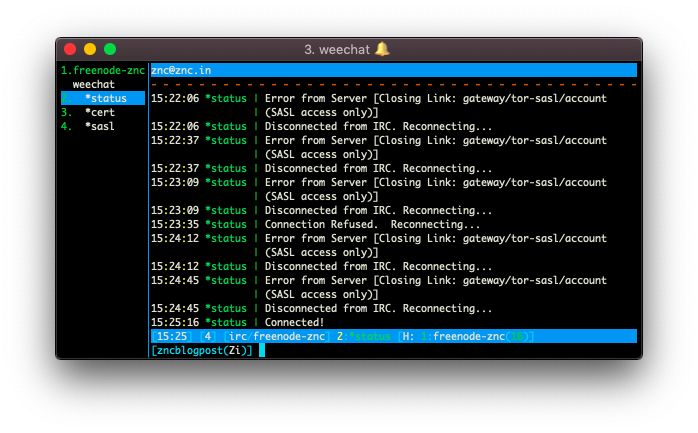
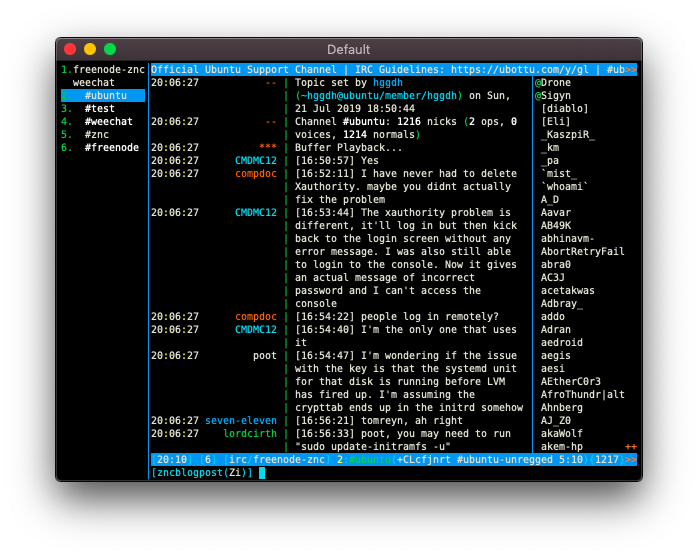
And now, the part we’ve all been waiting for… Let’s actually connect to a channel:
/join #ubuntu
Congrats, you’re up and running. The next section will deal with some recommended configuration and how to sync with multiple devices via ClientBuffer.
Futher Configuration
Enabling Colours for ZNC Playback
To get this working, we’ll be using an unofficial script called zncplayback.py. This is hosted here if you’d like to read the source. All that’s required in order to install it is the following:
/script install zncplayback.py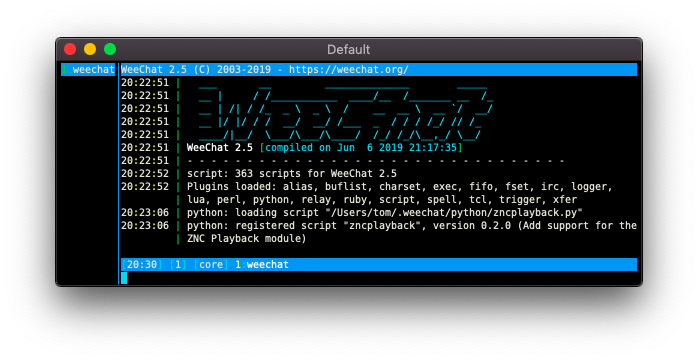
Auto-sort Channel Buffers by Name
When you are a member of many channels, keeping track of them can be a pain. It is possible to manually sort them, but it’s much easier to let a script do it for you. we’ll be using an unofficial script called autosort.py. This is hosted here if you’d like to read the source.
/script install autosort.pyHide Join/Leave Messages
As per this blog post, removing all the annoying join-message spam is very simple:
/set irc.look.smart_filter on
/filter add irc_smart * irc_smart_filter *
Before and after:
Enable the Mouse
I have mixed feelings about whether this is a good idea. If you’re interested in being able to use the mouse then I recommend reading the manual. Using the mouse lets you click on channel names and scroll in buffers with the mouse wheel. I suspect that just learning the keyboard shortcuts well, and setting up your own, is more productive long term.
Setting Up the ClientBuffer Module
If you’d like to connect to ZNC from mutiple devices, this section is necessary. If you only ever intend to connect from one device, it is not.
As described in the introduction, if you use the same ZNC playback buffer for both devices, the replayed messages will be split across the devices. The ClientBuffer module solves this problem by having ZNC maintain a separate playback buffers for each.
We will be following instructions on this page to install the module and this page to configure the module. The source code for the module is hosted here.
Firstly, it’s nessesary to acquire the znc-buildmod tool:
$ sudo apt install -y znc-dev
$ znc-buildmod
[ ** ] USAGE: /usr/bin/znc-buildmod <file.cpp> [file.cpp ... ]
Next we have to get hold of the ClientBuffer source:
Note: If you don’t have git on the server and don’t want to install it, you can get a zip from the repository’s “Releases” page.
$ cd ~
$ git clone https://github.com/CyberShadow/znc-clientbuffer.git
$ cd znc-clientbuffer
$ znc-buildmod clientbuffer.cpp
Building "clientbuffer.so" for ZNC 1.6.6... [ ok ]
$ sudo chown znc:znc clientbuffer.so
$ sudo mv clientbuffer.so /usr/lib/znc/
$ sudo systemctl restart znc
Note: I don’t believe the service restart is necessary, but better safe than sorry.
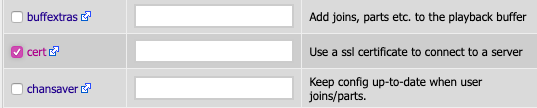
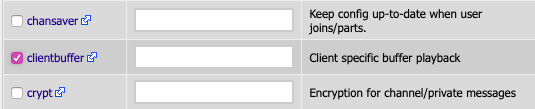
With the module built and installed, we need to enable the module in our Network’s settings:
Log in to the web admin and navigate to the “Your settings” page. Next, scroll down to the networks section and edit your network. Enable the module from its list of available modules:
Now that the module is enabled, it’s time to add a client:
/query *clientbuffer Help
/query *clientbuffer ListClients
/query *clientbuffer AddClient mac
/query *clientbuffer ListClients
In order to tell ZNC which client we want to use, we need to include it in our usename upon connection:
/disconnect -all
/set irc.server.freenode-znc.username "tom@mac/freenode"
/connect freenode-znc
/query *clientbuffer ListClients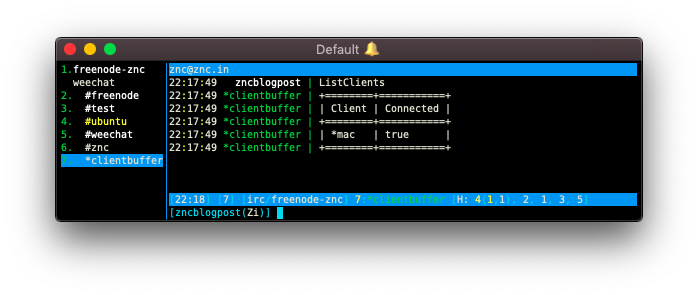
For any other devices, all we need to do is create a new client (using AddClient) like we did above and include that with our ZNC username upon connection. That way messages will be correctly replayed on both devices. Don’t use the same client name for multiple connections or you’ll run back into the “messages split across devices” issue.
Conclusion and Clean-up
If you installed ClientBuffer, I recommend leaving your working dir where you have access to it. You may need to recompile the module in future.
Removing our direct connection that we used to get the cerificate set up is likely desirable at this point:
/server del freenode-directWe may also want to set up our ZNC-based connection to autoconnect when weechat is opened:
/set irc.server.freenode-znc.autoconnect onIs the connection between weechat and ZNC secure?
I’ve heard talk of people making ZNC itself also a tor hidden service. I personally don’t see the point. A tor hidden service is meant to protect the client and server from revealing their true source IP to one-another (and also to hide who is communicating with whom from global observers - Hello Five Eyes!). In this case, we are both client and server so we’d be protecting ourselves from ourselves.
It’s sufficient to encrypt the traffic between our IRC client and ZNC. We may not have a certificate signed by a certificate authority, but given that ZNC generated the certificate itself and we added the fingerprint to weechat’s config, we can be pretty sure we aren’t under a man-in-the-middle attack while communicating with our bouncer. If you don’t trust ZNC’s autogenerated cert, you can replace it with your own without much issue. All a global observer sees is encrypted traffic between one IP and another.
Currently though, we’re serving the web admin over plaintext HTTP. That isn’t ideal. If you would like to encrypt that traffic, you have a couple of options:
The first is to just enable SSL for the web admin port (via the web admin). If your’re using the web admin to do this, you may have to create a new HTTP port temporarily. This is because the web admin won’t allow you to alter the port you’re currently connected via. Next time you navigate to the page via HTTPS, you’ll get a warning from your browser. You can check that the fingerprint is what you expect and tell the browser to ignore the warning.
The second option involves using Let’s Encrypt to get a valid, signed certificate from a trusted authority. If you’re interested in that approach, you should check out my other blog post on the subject or read about signed SSL certificates on the ZNC wiki.
If we use the method I wrote about, we can also replace our generated certificate for the IRC connection with the new Let’s Encrypt certificate too. In this instance, you should unset ssl_fingerprint in your weechat server config. When using a signed certificate, you can rely on the Public Key Infrastructure to validate it. The frequently-renewing nature of Let’s Encrypt certificates means that not removing the fingerprint will cause you problems when the certificate is renewed (because the fingerprint will no longer match). I may write this up in future.

Thomas Busby
I write about computing stuff